Friday, August 5, 2011

Vacation T-shirts!

We've gone to Florida every year since Amelia was small and portable, and I'd encourage it as a vacation destination. The entire Orlando area caters to families. Every restaurant within 50 miles has a changing table, a kid's menu, and a family restroom.

Plus, I would highly recommend the theme parks. Pete and I are roller coaster junkies, and we're raising a little coaster fanatic, so the three of us can spend an entire week going from thrill ride to thrill ride.

As much as I love the parks, however, I despise the prices. At Disneyworld, you can spend $50 or more for a single T-shirt. So, in order to save a little money, I decided to make a few souvenirs before we even boarded the plane. Every day of our vacation, we had matching T-shirts, which I had made ahead of time on my embroidery machine.

There's a huge Dr. Seuss land at Universal Orlando, so these shirts were appropriate for our first day there. Why is Amelia Thing One? Because we let her choose.

The Fantastic Three!

These shirts are decorated with the Hogwart's crest. Mine reads "Slytherin Class of '93," Pete's reads "Hufflepuff Class of '88," and Amelia's reads "Gryffindor Class of '24."

I didn't actually make our Fourth of July Shirts, but I bedazzled mine and Amelia's. Pete passed on the bedazzling.

Amelia's "The Marshall Bunch" shirt doubled as a blanket for Baby Sister, who slept very nicely in the hotel's nightstand drawer.
Hopefully, it'll be a few years before Amelia starts thinking this is dorky. Right now, she loves matching with Mommy and Daddy and, as an added benefit, it makes her much easier to spot in a crowd of cookie-cutter shirts.

Saturday, July 30, 2011

Baby Sister's Binkie

Amelia sucks her thumb. I'm not worried that revealing this on my blog with scar my daughter for life, because she's not embarrassed about it at all. In fact, while I was suffering from a migraine last week, she curled up on the couch with me and shared some prime thumb-sucking tips:

"You've got to use your left thumb, Mommy. It tastes better than your right thumb. And you've got to tug on your ear with your other hand. Try it - it will make you feel better!"

Amelia is also insistent that all of her dolls have either a thumb or pacifier to suck when she swaddles them at night. Sometimes, this is easy. Certain baby dolls even come with their mouths open and thumbs extended, including one doll who makes sucking noises. This doll also cries when she can't find her pacifier. She is very loud and was one of Santa's worst ideas.

Some dolls, however, have what might be called a poor sucking reflex. Several times, Amelia has expressed concern because her favorite doll, Baby Sister, has a closed mouth and can't take a binkie. Usually, she worries about this at bedtime. Since Amelia can't settle down until Baby Sister does, it's made for a few long nights.

Last week, I finally found a way for Baby Sister, Amelia, and all of us to get a good night's sleep. On a trip to Target, I purchased a package of pacifiers and a package of adhesive putty. I cut the rubber part off of the binikies and attached a chewing-gum sized piece of adhesive putty. Then, I used the adhesive putty to adhere the pacifier to Baby Sister's mouth.


Because adhesive putty is removable, Baby Sister could suck her binkie at night and put it aside during the day. Amelia was thrilled. In fact, a couple of nights later, she announced that Baby Sister was ready to move from her little bed and sleep on the toy box with the other dolls. She said that she was proud of Baby Sister, but also a little sad.


As for Amelia, it seems that similar progress is being made. She now has two loose teeth, which has made thumb sucking difficult. Yesterday, I noticed that she fell asleep with both hands - and thumbs - folded on her belly. I'm very proud, but I'm also a little sad.

Sunday, July 24, 2011

The Wizarding World of Harry Potter


Since I focus so much of my reading on comic books and graphic novels, I arrived late to the Harry Potter craze. I started on "The Sorcerer's Stone" right after "The Prisoner of Azkaban" came out in paperback and only a few weeks before the first movie hit the theaters. It was an exciting time to be reading Harry Potter, since I blew through the first three books in a single weekend and saw the movie shortly thereafter. By the time "The Deathly Hallows" hit bookstores, I was a textbook-definition crazed fan, waiting patiently at Barnes and Noble when the clock struck midnight.

So, naturally, I had to make a trip to The Wizarding World of Harry Potter at Universal Islands of Adventure in Florida. It didn't disappoint. I'm never going to get my own letter from Hogwarts, but this truly is the next best thing.

Hogwarts is the first thing you see when you enter the park. It's larger than any other structure in the park and it really stands out. The effect is similar to walking into Disney's Magic Kingdom and seeing Cinderella's castle.


To actually get to the Wizarding World of Harry Potter, you need to cross the other lands of the park, (including an incredible land dedicated to Marvel superheroes). Once you're there, you've entered into an entirely different world. Even the signage is just a bit more British.
The first thing you'll see is the Hogsmeade Station, complete with the Hogwarts Express. You can't really board, but you can watch it blow steam every few minutes. We posed for photos with the conductor before buying pumpkin juice (apple cider with just a hint of pumpkin flavor) from a nearby sweets trolley.
You can buy all of the Harry Potter sweets at the Wizarding World. In fact, there are several stands throughout the park selling regular and iced, slushy varieties of butter beer. We bought some, and were slightly disappointed to find out that it tastes just like American cream soda. The chocolate frogs we bought at Honeyduke's, on the other hand, were delicious.

There's a great attention to detail throughout the park. It feels like you've stepped into the village of Hogsmeade:


A display in the window of Honeyduke's Candy Shop advertises puking pastilles. Thankfully, the pastilles aren't really for sale.

The window of the quidditch supply shop.

Mandrakes and gillyweed in the window of the Hogsmeade florist.

Audio-animatronic owls line the walls of the post office.
Some of the items on display at Zonko's joke shop. If you buy a pygmy puff at Zonko's, they hold a very loud pygmy puff adoption ceremony. Amelia named her pygmy puff "Pinky."
The attention to detail doesn't stop with the shops. Authentic noises are piped into various areas of the park, including Moaning Myrtle audio in the restrooms!

There are three rides in the Wizarding World. One is a standard roller coaster called The Dragon Challenge. If you have a keen eye, you'll recognize it as a re-vamped version of the old "Dueling Dragons" coaster that has been at Universal for years. It's a great coaster, and I was sorry I didn't have the chance to ride it on this trip, since I was accompanied by a coaster fanatic who is four inches too short to ride.

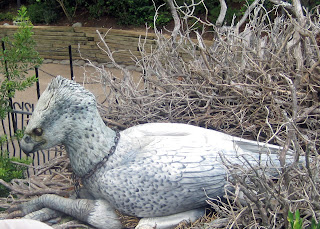
There's also a smaller coaster called "Flight of the Hippogriff." It's a cute kiddie coaster where you ride past Hagrid's hut in a car that looks like a wicker basket. You'll soar over a pretty convincing animatronic hippogriff:
Remember to treat the hippogriff with respect, and let him make the first move. Otherwise, you might lose a limb!

The best ride in the Wizarding World and arguably the best ride in the muggle world as well is "Harry Potter and the Forbidden Journey." Before we boarded, I asked a ride attendant what the ride was like, and she told me that it was "kinda like a motion simulator." Now that I've ridden, I can tell you that, if "Harry Potter and the Forbidden Journey" is "kinda like a motion simulator," the iPad is "kinda like a pad of post-it notes."

The ride starts as a motion simulator and switches to a traditional dark ride and back again several times. Also, because you're in an individual car with only three other people, there's an emphasis on the motion. At several points during the ride, you are on your back with your feet above your head. The storyline is that muggles have been invited to Hogwarts to sit in on a few classes. Harry, Ron and Hermione make an appearance (via a very realistic film/holograph effect) and suggest that you might prefer watching a game of quidditch. On your way to the quidditch pitch, however, you encounter dragons, dementors, and Draco Malfoy. I didn't film the ride because I was too enthralled in the wonderful effects, but there are some great videos online. My favorite is here. The video is a little too dark to give you the experience of riding, but it gives you a good idea of how special this ride is. You really feel like you're in the world of Harry Potter. Even the queue is an experience. You walk through Hogwarts castle.

Hogwarts is a big place, and the queue area doesn't skimp on details. You really get the feeling that Hogwarts is immense, mysterious, and dangerous.

Here's the beginning of the queue. In the movies, this statue guards the entrance to Dumbledore's office.
The portraits talk to you, to themselves, and to each other.

The mandrakes are maturing in the greenhouses.
Some of the many instruments in Dumbledore's office
Dumbledore greets you personally in his office, and welcomes you to Hogwarts.


Another view of Dumbledore's office

The Defense Against the Dark Arts classroom is where Harry, Ron, and Hermione appear and invite you to quidditch. Ron also accidentally makes it snow in the classroom for a few seconds, which is a great effect.

I always love seeing this dragon skeleton in the movies. Seeing it in person was awesome.
In addition to the rides, there are lots of shows in Hogsmeade. The Beauxbatons and Durmstrang schools put on a demonstration.
You can also watch the Hogwarts choir perform with their toads. Keep an eye on the girl from Slytherin. She stays in character throughout the entire show:


All in all, Universal has done a wonderful job with the Wizarding World of Harry Potter. I was sad to leave and had to console myself with re-reading "The Deathly Hallows" and seeing the movie on opening day.

Thursday, June 16, 2011

The Best Chocolate-Free Dessert I Can Make

A few years ago, I was diagnosed with Interstitial Cystitis. It means that the lining of my bladder is damaged, and it's very, very painful. When it flares up, I'm supposed to watch my diet. Shortly after my diagnosis, a very pretty clinician handed me a six-page, double-sided, single-spaced document.

"Here's the recommended diet," she said, a little too cheerfully.

"I can do this," I said, as I scanned the packet and noticed that it contained most of the foods I usually eat.

"Oh, no." She laughed at what was probably a common misunderstanding. "Those are the foods you're supposed to avoid." She handed me a much smaller, two-page packet. "These are the foods you can eat."

Naturally, chocolate is on the list of foods to avoid. I've struggled with this. For me, dessert isn't worth eating if it doesn't contain chocolate. I'm a sucker for any restaurant that offers a "death by chocolate" dessert. I see that as a challenge. You think you can kill me with chocolate? I'd like to see you try.

But, I'm sans chocolate for the next couple of weeks, and I'm trying to make do with white chocolate.

Normally, white chocolate doesn't cut it. It's not even chocolate. It's made with cocoa butter, but not cocoa powder, so it has the texture of chocolate, but none of the flavor. The trick is coming up with a recipe that makes use of the ooey, gooey texture without relying on the taste.

I think I've found that perfect mix in these bar cookies. They melt in your mouth, but they're heavy on butterscotch, nuts, and coconut. Restaurants normally don't try to kill you with white chocolate. But, if they did, they'd do it with this dessert.
Here's what you need:
  • One stick of melted butter
  • One cup of graham cracker crumbs
  • One cup of flaked coconut (I usually make a trip to Sprouts for unsweetened coconut, but the sweetened kind is good, too)
  • One cup of white chocolate chips
  • One cup of butterscotch chips
  • One 14-oz. can of sweetened condensed milk
  • One cup of chopped, roasted, salted cashews
Preheat the oven to 350. Pour the melted butter evenly over the bottom of a 9-inch square baking pan (If you're using a glass pan, you can melt the butter in microwave right in the pan). Spread the crumbs over the butter, making sure they soak up all of the liquid. Top with coconut and both kinds of chips. Drizzle evenly with the sweetened condensed milk and sprinkle with the cashews. Bake for 30 minutes or until lightly browned.

These are very sweet, so a little bit goes a long way. They're also very good over ice cream.

Wednesday, June 15, 2011

How to fix a doll

A few years ago, Amelia started asking why she didn't have any dolls that looked like her. This was a tough question. There are caucasian dolls and there are African-American dolls, but there are very, very few light-skinned African-American dolls with very light hair and blue-green eyes. In fact, the only company making such dolls was Bratz, and Amelia was scared of the Bratz' big heads and bug eyes.

Then, we found My Twinn, a company that will make a doll that looks like your child. And, for her fourth birthday, Amelia received her very own My Twinn doll, customized to look just like her. She christened it Baby Sister, and a great love story began.


Baby Sister goes with us everywhere. She's been to the Peditrician's office, the first day of school, and Disney World. She sits with us at dinner and, if I'm making cookies, I have to make a little cookie just for her. Amelia brushes Baby Sister's teeth every night and, when she uses the potty, she makes sure Baby Sister goes, too.

Then, last week, a great tragedy occured. Baby Sister's arm came loose.
I suggested sending Baby Sister to the doll hospital, but Amelia couldn't bear to be parted from her best friend for one night, let alone the three weeks it would take to ship Baby Sister to the doll hospital and wait for her to come back. Something had to be done immediately.

Fortunately, I used to collect dolls and, through collecting, learned a few things about repairing them, too. So, the first thing I did was let Amelia and Baby Sister have some ice cream. It calmed them down enough that we could all make a trip to the hardware story for Devcon Plastic Welder.
After Amelia was in bed, I very carefully removed Baby Sister's arm. It had been stitched on to her body, so I used my seam ripper, taking care not to damage her body. Once, I removed her arm, I found that the entire joint had been shattered, so I mixed up the plastic welder. This stuff is STRONG, and it smells horrible. You have to activate it by mixing the glue and the resin and, once they're mixed, you have to work fast.

Then, I filled the arm cavity with the plastic welder and shoved her arm back on her body. (I'm sorry I don't have photos of this, but I was juggling baby sister in one hand, and the plastic welder in the other). I held it in place until it started to set. You can tell it's working because it gets hot!

Once the doll cooled down, I glued her "skin" back in place. I couldn't sew through the plastic welder, so I had to use a few drops of E-6000.
I used the glue very sparingly, and it formed a good, tight seal.

By morning, Baby Sister was back in her little bed next to Amelia's bed. It was a very happy reunion:

Saturday, June 11, 2011

How To Make A Lightsaber

At Disneyland, they have a store where you can build your own lightsaber for $20. I'm sure that it's a truly awesome, once-in-a-lifetime experience, and that's why Amelia was begging for two. Why did she need two lightsabers? Because it's no fun having a lightsaber duel with just one. Duh.

Unfortunately, $40 is a little steep, even for the signature weapon of the Jedi order. Still, I can't deny my daughter anything, so I started searching for ways we could make our own lightsabers at home for less. Most of the online instructions that I found sounded really cool, but were expensive in their own right. They also involved use of a drill, hacksaw, and vibrating motor, none of which I'm letting my five-year-old destruction machine touch for many, many years.

Then, I discovered Krylon Glowz paint at Michael's.
For $7 a can, you can add a colorless, glow-in-the-dark coating to any surface. And the lightsaber workshop was on! Here's what you need:
  • 1 can of Krylon Glowz
  • A Few jars of poster paint
  • Empty wrapping paper tubes
  • Newspaper
  • Flour
  • Water
  • Silver Duct Tape
  • Inspirational Music (I suggest the original Star Wars Soundtrack or "Yoda" by Weird Al Yancovic)
We made a paper mache mix of one part flour to two parts water. (I also threw in a couple of tablespoons of cinammon, so our lightsabers wouldn't smell like newspaper). Then, we ripped the newspaper into strips, and paper-mached the wrapping paper tubes. We didn't paper-mache over the top of the tubes. That way, they made a cool "whoosh" sound when we swung them around later. While we waited for them to dry, I asked Amelia what color she wanted her lightsaber to be. She said she wanted a pretty pink lightsaber, just like Darth Vader's:
I tried explaining the difference between pink and red but, honestly, I could see her point.

When the lightsabers were dry, we painted them with poster paint and coated them with the Krylon Glowz. They dried in about an hour. By then, it was getting pretty dark outside and they really started to glow. We gave them quick handles with silver duct tape and dueled until bedtime.  


If you wanted to make a whole bunch of these for a Star Wars party, you could skip the paper-mache step and just paint the wrapping paper tubes, but they'd fall apart a little faster. Of course, at less than $1 per saber, you can always make more.

Wednesday, June 8, 2011

Star Wars Buttons!

This week, I rode the new Star Tours ride at Disneyland for the first time. While I’m a little nostalgic for the old ride, I loved the update. And it put me in the mood for some Star Wars crafts. First up: Star Wars fabric covered buttons!
One of my favorite things to do with 1” circular bottlecap images is to make fabric-covered buttons. They’re the perfect size for button-making, and the designs coordinate well with so many types of fabric. Today, I’m using my Star Wars images, which are available here, but you can use any images. Here’s what you’ll need:

One sheet of circular images
One sheet of iron-on transfer paper
A scrap of white- or light-colored fabric
A good iron
A pillowcase
A hard surface
5/8” or 7/8” buttons and a button-covering mold. I get mine from Cover Button City. Just a note: Choose your button size based on your designs. A one-inch image will run slightly off the sides of a 5/8” button. The same image will sit squarely in the center of a 7/8” button, with just a little extra fabric around the edges.
Cardstock
First, you’ll need to print out your images on the iron-on transfer paper. Your paper might be smaller or larger than standard 8.5x11” paper, so make sure to turn off the scaling options on your printer. This will ensure that your images are exactly 1.” Also, if your image contains text, you’ll want to flip the image in your photo-editing software since the finished button will show the reverse of your original image!

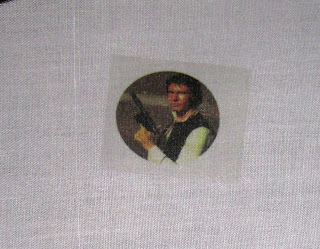
Next, choose the images you want and cut them out. I’ve decided to go old school Star Wars with my buttons, so I’ve cut out Luke, Leia, Darth Vader, and Han Solo. You don’t need to cut them out perfectly. Only the circular image will show on your final button.

Lay your pillowcase down on your hard surface. Top it with your fabric and, finally, with your images. The image side should be down. You'll want to do this on a table or countertop. Don’t use an ironing board.
Turn your iron to its hottest setting. Then, press it down on each image for 8-10 seconds. The image should adhere to the fabric.

Peel the paper backing off of each image. The image should have transferred onto the fabric.

Your buttons might have come with a button-covering template. If they didn’t, don’t worry. Take your cardstock and cut a 2” circle. Place it over your transfer, with the image squarely in the center. Trace and cut. (I don’t recommend using a sharpie for this, but it shows up better in pictures, so I’m using one here).

Place your image in the center of the button mold. Make sure the image is centered.

Place the button on top of your image, and push the excess fabric over the back of the button.

Cover it with the button back and push the entire thing together with the blue pusher.

Repeat these steps with the rest of your images. When you’re done, you should have a handful of buttons that are perfect for dressing up a shirt or a jacket. I'm putting mine on a dress for my daughter. It should look great the next time I put her hair in Princess Leia buns.

Wednesday, June 1, 2011

Best Pattern Ever

My favorite pattern in the whole, wide world is McCall's 4186. A quick glance at the cover of this pattern doesn't do it justice. It's an incredibly simple pattern that makes a wonderful doll. For about six hour's worth of work, you'll end up with a soft, cuddly doll that will fit any of the popular 18" doll clothes. If you cut out several dolls at once, you can make them via assembly line, which is great news for someone with a daughter and five nieces. It doesn't get any easier than that.
The first time I made this doll was for my daughter, in 2009. This was before I had an embroidery machine, so I hand-painted the face. One of my only complaints about this pattern is that the iron-on transfer face that comes with it is a bit bland and devoid of personality. Here, I swapped it out for a doll face I found in a dollmaker magazine in the 1980s. 

The second time I made this pattern, I enlarged it by 126 percent, so it would be the same size as the My Twinn dolls. My daughter wanted a Hermione Granger doll that she could cuddle at bedtime, so I tried my hand at copying Hermione's face. This doll has been well-loved, and has played a lot of quidditch with my daughter. She's probably ready for a new wig. I always assume that doll wigs will eventually need to be washed or replaced, so I glue them on with hot glue and secure them with a couple of tacking stitches. They stand up to heavy brushing, but they're easy to remove when the time comes.
Recently, I've been making dolls for my nieces. I haven't taken pictures of all of my finished dolls, but my daughter caught a snapshot of this one before we wrapped it and sent it to her cousin. As you can see, I've had a lot of fun digitizing doll faces and stitching them on my embroidery machine. I've been using cut-away, iron-on stabilizer when I embroider the faces. It makes them feel a bit sturdier. I was recently thrilled to discover that Floriani makes a peachy-colored stabilizer that blends quite well with both light and dark flesh-colored fabrics.
The only other complaint I have with this pattern is that it tells you to hand-gather the neck edges after you've stuffed the head, but it doesn't specify how to do that. You need to use two strands of embroidery floss when you're gathering, because regular thread will break. Other than that, this is a wonderful pattern. In fact, I have three more of them cut out and ready to go!